Monday, November 30, 2009

2009 Holiday Decorating Trends - BTSH Around The House Tip of the Week

You may have noticed that the stores have their holiday decorations out (in fact, I think they jumped the gun on them this year and had them out before Halloween). Well now they are even playing Christmas music too, so you know what that means—it’s time to spruce up your home for holidays. Everyone has their classic, traditional pieces that are put out year over year, but it’s nice to keep your décor fresh and exciting, so this year I have put together some suggestions for getting your home Christmas Trendy.


Keep It Natural
The “green” theme has been brought to holiday decorating by bringing much of nature indoors this year. Look for boughs, holly, sprigs, berries, and pinecones for a natural , organic look. Burlap has also made an incredible appearance this season, and can be seen as stylish tree skirts, ornaments, gift bags, and more!

Consider Alternatives to the Traditional “Pine”
Pine has always been first choice for garland, wreaths, and planters. This year, consider changing it up with some Eucalyptus or Fir, both of which will fill the room with a beautiful aroma. Another great alternative to pine is feathers, which are available in a variety of styles and colours this year, from wreaths, to garland, and even pillows.

KISS—Keep It Simple Silly
Keep things understated this season, and avoid over-decorating. Remember to follow this rule - for every holiday decoration you set out, a non-seasonal item should be removed and packed away until after the holidays.

Colour Trends
The most popular colour this season is the colour of snow—a nice, crisp white. If you are looking to add some colour, keep it monochromatic. Staying within the same colour family will keep it simple and understated. Popular non-traditional colours this year are blues and purples. Silver once again remains strong, and is found to be especially glittery this season.

Other Tips
- Compliment your existing décor—be sure that whatever you choose works well with your everyday furnishings and colours. Don’t be afraid to pack away some items until after the holidays.

- Give your existing “traditional” pieces a facelift with a little paint—spray paint traditional items such as garland and pinecones for a modern day twist on an old classic.

- Make use of lights and candles to give your home that warm touch. Choose a seasonally scented candle for added effect, such as cinnamon spice, gingerbread, or cedar.

- Keeping with the natural theme, and as a way of doing your part for the environment, visit your local thrift shops for some vintage bulbs and wreaths, and have fun mixing the old with the new.

Written by Shauna Lynn, Beyond The Stage Homes
www.beyondthestagehomes.com

Monday, November 23, 2009

Coffee Table Books - BTSH Around The House Tip of the Week

I love coffee table books. When I entertain, I seldom have the TV on. When there is a lull in the dialogue of my guests, a coffee table book is always a great way to invoke conversation. A coffee table book should be a non-fictional book, that can be glanced through, not read cover to cover. According to Wikipedia, a coffee table book is defined as “...a hardcover book that is intended to sit on a coffee table or similar surface in an area where guests sit and are entertained, thus inspiring conversation or alleviating boredom.”

Choosing Your Coffee Table Books
Match the books to your personality. These books should be a reflection of you, and your home. If you’re a fun-loving person that enjoys decorating in bright, primary colours, why not include a Dr. Seuss book, such as “Green Eggs and Ham”? Books with illustrations are always a great idea, such as photography or art books, or perhaps a book on your favourite musician. Another idea would be a book of riddles—these never fail to entertain!

If you’re more of a scholar, scan the reference section at your local bookstore for inspiration. Consider books such as Webster’s Dictionary, or Volume A of the Encyclopaedia. If anyone asks where the rest of the collection is, tell them that don’t want to buy the next volume until you see how the first one ends, or it will ruin it. Another idea would be a book of poems from your favourite poet, or The National Geographic Image Collection.

Have a large table? Buy a large book! Some books are simply meant to be viewed in a large format, so find an educational book such as “The Times—Concise Atlas of the World”, or a beautiful art book, such as “Georgia O’Keefe—An American Perspective”, a collection of some of the most iconic and significant artworks of the 20th century.

What’s On My Coffee Table? (well actually, it’s an ottoman)
This Little Piggy Went To Prague by Amy Allen — this is the latest addition to my collection. I picked it up at a little bookstore in St. Jacob’s, and it contains a fashion forward spin on classic nursery rhymes.

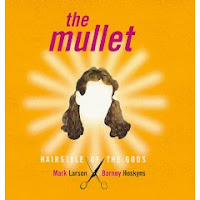
The Mullet, Hairstyle of the Gods (Mark Larson and Barney Hoskyns) - Given to me by my brother several years ago, I never get tired of this one. The book gives the history of the “mullet” hairstyle through the ages, including images and illustrations of the various styles, and the celebrities that wore them.

The New York Bartender’s Guide by Sally Ann Berk — Being a bartender myself, I seldom use this book for actually finding cocktail recipes, but since I do stock an extensive bar, it does come in handy at gatherings when a guest requests an unusual drink, or wants to try their favourite liqueur in a new way. This allows them to do some experimenting, and keeps me from playing bartender all night.

He’s Just Not That Into You, by Greg Behrendt and Liz Tuccillo — The book that inspired the movie, I fell in love with it after the famous Sex and The City episode that inspired it. Greg was a consultant on the show, and Liz a writer. Written as advice-seeking letters to Greg, the two explain what a guy is really saying by his actions.

Written by Shauna Lynn, Beyond The Stage Homes
www.beyondthestagehomes.com

Monday, November 16, 2009

Counting Down With a Hand-Crafted Advent Calendar - BTSH Around The House Tip of the Week

While I understand even as an adult that the holidays are all about family and friends, I can’t help but reminisce about one of my favourite parts of the holidays, which was the Advent Calendar countdown to Christmas. Let’s face it, who wouldn't enjoy counting down the days to Christmas with a piece of chocolate every day!

Well, given my love of crafts, and the environment, I thought it would be a great idea to help two of my favourite munchkins create their very own, reusable, advent calendar. My girlfriend’s kids have been a large part of my life, and I enjoy spending lots of time with them, so whenever we plan a sleepover, we also plan for a fun craft. This one was incredibly easy, and can be used for years to come. My only regret is that I didn’t make one for myself!

Tools You’ll Need:
Painting Canvas (minimum size 16” x 12”)
Christmas Fabric (optional)
Staple Gun (only necessary if using fabric)
Glue Gun—be sure that an adult does this part
25 Small bead containers or small boxes
25 Foil Squares—cut into squares approximately 2”x2”(necessary only if containers don’t have lids)
25 Candies/Chocolates—be sure they fit into whatever containers you have chosen
Scissors
Construction Paper
Scotch Tape
Permanent Marker
Christmas craft accessories—eg: scrap-booking decals, garland, beads, confetti, etc

Cut the fabric to approximately 1” larger than the canvas on all sides. Stretch over the canvas, and use the staple gun to tack to the back of the canvas. If you don’t want to use fabric, set out some paints for the kids to decorate the canvas with. Then let the kids use the accessories to decorate however they see fit! I found it best to have them lay everything out on the canvas how they wanted it, and I simply went over it all with the glue gun when they were done. This allows them to make any changes they want to along the way.

For the containers, I had found these plastic bead containers at the dollar store, but they didn’t come with lids. So, we went to the bulk food store to find the candies, and while I was there I picked up some pre-cut 4”x4” foils in silver and gold (sometimes they will have other colours available as well). I then cut these into quarters, had the kids write the numbers 1-25 on them with a permanent marker, and we attached them over our containers by simply wrapping the edges in clear scotch tape (after putting the candy/chocolate inside of course). Each day in December, they simply poke through the foil to get their treat. I also cut strips of festive coloured construction paper 4” x 1/2”, and these were placed inside the containers to wrap around the inside edge to keep from being able to peak at the treats. Wondering why the one on the left has fewer containers? She didn’t want to take away from the decorations, so she put 2 treats in each container, and marked each with 2 days. The best part is that these can be used each year simply by replacing the treats, and the foil. It doesn’t get much simpler!

Written by Shauna Lynn, Beyond The Stage Homes
www.beyondthestagehomes.com

Monday, November 9, 2009

Big City Shopping Close to Home - BTSH Around The House Tip of the Week

Think you have to head to a big city to get great home décor? You might be surprised at what you can find in your own backyard. If you’re looking for something original and different, check out these stores that rank in my favourites for local shopping.

Conestogo Mercantile
Conestogo Mercantile is NOT your average home store. If you live in the Waterloo-Wellington region, and haven’t been to check out their store, drop what you’re doing, and GO! Located at 1857 Sawmill Road #2 in Conestogo, they have been told for years that they’re different, and they love it. Everything they carry is fun, and somehow they manage to always keep ahead of the trends. In addition to home décor, they also carry a variety of handbags and fashion accessories, as well as many unique baby items. I simply can’t say enough good things about this store. Looking for a great centrepiece for the holiday season? Get one your guests will admire and talk about at Conestogo Mercantile. Don’t forget to check the name board while you’re there—it is located behind the checkout counter, and if your first name matches a name on the board, you’ll receive 10% off your purchase!

Paula White Diamond Art Gallery + Design Studio
Dress your walls in unique, original art from PWD. Located in St. Jacobs, the Paula White Diamond gallery represents both established, and emerging artists in a variety of media, styles, and prices. The best part? Approximately 80% of the artists are local! The owner, Paula White-Diamond, is also the in-residence artist, and produces original large scale oils, acrylics and mixed media works to residential and corporate clients. PWD Art Gallery also offers sculpture, original works on paper, and limited and open edition prints. The gallery is currently located at 1369 King Street North, Upper Level, in the Sampson’s Building, with plans to move to the new Bauer building on King Street in Kitchener soon. For more information, visit them online at www.paulawhitediamond.com.

Structube
Located at 4585 King St E (near Sportsworld), this store has everything you need for your home, at great prices. Their funky, unique products are displayed in their large showroom, and everything that it not a part of the structure is for sale. Structube started as a family business in Quebec 31 years ago, and has since grown to 20 stores throughout Quebec and Ontario. Their store in Kitchener opened in January of this year, and they have seen great success so far. This is the kind of store that Kitchener has been waiting for. Contemporary and modern, great quality products, at prices lower than you would expect.

Written by Shauna Lynn, Beyond The Stage Homes
www.beyondthestagehomes.com
Monday, November 2, 2009

Simple Tea Towel Curtains - BTSH Around The House Tip of the Week

Last week I talked about how I learned to sew by taking a great sewing course at KW Sewing Machines Ltd. at Frederick Mall. I have spoken to many people since then that while they would love to take the time to learn how to sew properly, they feel comfortable doing simple mends and simple stitches for the things that they need, and love little projects that don’t require too much skill. If you’re a beginner sewer, and want to simply sew straight seams, this is a project for you! You can use any sewing machine for this project, even a simple compact machine. I originally saw this idea in a home magazine a couple of years ago, and after searching for curtains for my own kitchen to no avail, I decided to give it a try.

Tools You’ll Need
Sewing Machine (as I said, any machine will work for this)
Scissors
Pins
Tea Towels (quantity will depend on size of your window)
Measuring Tape
Ribbon (quantity will depend on size of your window)
Empty wrapping paper or fabric roll
Utility Knife
Curtain Rod with hanging hardware

Start by measuring the window. I measured mine inside the frame, but if you want yours to go over your frame, measure accordingly. Be sure to measure side to side, and top to bottom. Next, find the right tea towels. Do NOT go into your linen closet for these, be sure to buy brand new so that they are crisp and new. I used this method for curtains for two different windows. On the one window, I lucked out that the length of the tea towel was exactly what I needed for the curtains, saving me a few stitches, but this isn’t necessary. If possible though, try to get ones that are at least as wide as your window—it’s easier to take some off the sides, then to try to add to them. Once you have found the tea towels, you can find a complimenting ribbon.

For the sewing part, you’re looking at only a few seams. You’ll need one straight seam at the top, large enough for the curtain rod to fit through. You’ll need one to attach the tea towels together (the one I have shown used 2 towels). Pin the ends together, and sew this seam, and press open, then sew down each of these ends. If your towels are too wide, you’ll need to sew seams down the sides first as well. Pin first, and press if necessary. Once the curtains are completed, hang your curtain rod and attach your curtain.

Next, measure the width of your new curtains, and cut what you’ll need of the wrapping paper roll. I used a fabric roll, as it’s thicker, but these are harder to come by, so a wrapping paper roll will work fine. A utility knife should cut it easily. It doesn’t have to be cut perfectly, since it won’t be seen anyway. Determine approximately where you want the curtains to hang to, and measure and cut your ribbon accordingly. Place the roll at the bottom of the curtains and roll up to desired length, and secure with your ribbon. Now you can show off your new one-of-a-kind curtains to your friends!

Written by Shauna Lynn, Beyond The Stage Homes
www.beyondthestagehomes.com